This page collects setup notes for the email programs used with Pacific Internet email. It begins with webmail and the general email settings (also shown on the home page), then a guide to fixing outgoing-mail (SMTP) problems for each kind of phone and program, and then program-specific instructions, starting with Thunderbird. Additional client tutorials will be added here as they are written. For information about spam filtering, phishing, and the technical support policy, see Email Security, Spam Filtering, and Support Updates.
Webmail
You can read and send mail from any web browser without installing software. Address books and user preferences are not shared between the two webmail options.
Use these settings to configure email in your phone or desktop mail program. Authentication is always required, and usernames are case-sensitive (use lowercase).
IMAP (Incoming)
Server
mail.pacific.net
Port
143 (STARTTLS)
Username
user@pacific.net
Password
Email address password
SMTP (Outgoing)
Server
smtp.pacific.net
Port
587 (STARTTLS)
Authentication
Required — Password
Username
user@pacific.net
Password
Email address password
If your email address is on a domain other than pacific.net (for example, a business domain we host for you), use mail.hostedbypacific.net for incoming mail and smtp.hostedbypacific.net for outgoing mail; everything else is the same. Sending mail always requires logging in. If your mail will not send, see Can't send mail? Fix your outgoing settings below.
Can't send mail? Fix your outgoing (SMTP) settings
This page is for you if you can receive mail but sending fails: a message sits in your Outbox, or you see an error such as “Cannot Send Mail,”“The message was rejected by the server,”“Authentication required,”“Relay access denied,” or “554 5.7.1 Client host rejected: Access denied.” We may also have emailed you a link to this page.
Why this happens: receiving mail and sending mail are two separate steps. To send, your phone or email program must log in to our outgoing mail server (called SMTP) with your full email address and password, the same way it does to pick up your mail. If the outgoing user name and password are blank, or authentication is set to “None,” our server refuses the message. Many programs label those two boxes “Optional” — for Pacific Internet they are required.
The correct outgoing settings
Outgoing mail (SMTP) — use these exactly
Server
smtp.pacific.net (smtp.hostedbypacific.net if your address is on another domain)
Port
587
Security
STARTTLS (some programs call this “TLS” or “SSL”)
Authentication
Password (also called “Normal password” or “Login”)
User name
Your full email address, in lowercase — for example user@pacific.net
Password
Your email password
The most common mistakes, in order:
The outgoing user name and password are blank (they are often marked “Optional”).
Authentication is set to None.
The user name is only the first part of your address (user) instead of the full address (user@pacific.net).
The port is wrong. Use 587; port 465 is not available with our service, and port 25 is not meant for sending from customer devices.
You changed your email password recently and updated it for receiving mail but not for sending. Many programs store the two passwords separately.
iPhone, iPad & Mac (Apple Mail)
iPhone and iPad. Menu names differ slightly between iOS versions; the steps below cover current and older versions.
Open Settings. On current iOS tap Apps → Mail → Mail Accounts. On older iOS tap Mail → Accounts.
Tap your Pacific Internet account, then tap the account line at the top (your email address).
Scroll down to Outgoing Mail Server and tap SMTP.
Under Primary Server, tap the server name. If you have more than one outgoing server listed, make sure the one you edit is the one this account uses.
Make sure the server is On, then fill in every box:
Host Name:smtp.pacific.net
User Name: your full email address (the boxes may say “Optional” — fill them in anyway)
Password: your email password
Use SSL: On
Authentication: Password
Server Port:587
Tap Done. iPhone checks the settings; if it reports a problem, re-check the user name and password. Tap back until you return to the account and tap Done again.
Open Mail. If a message failed earlier it may be in your Outbox (or shown as “Not Delivered”). Open it and tap Send again, or send yourself a new test message.
Mac (Mail app).
In Mail, choose Mail → Settings… (older macOS: Preferences…), then click Accounts.
Select your Pacific Internet account and open Server Settings.
Under Outgoing Mail Server (SMTP), turn off Automatically manage connection settings if it is on, then check:
Host Name:smtp.pacific.net
Port:587 and Use TLS/SSL checked
Authentication: Password
User Name: your full email address, and your email password
Click Save, then send yourself a test message.
Android
Android phones use several different email apps, and their menus vary by phone maker and version. The setting you need is always called something like Outgoing server, SMTP server, or Server settings, and it has a Require sign-in (or “Authentication”) option that must be on.
Gmail app: tap your profile picture → Settings → your Pacific Internet account → Outgoing server (under Server settings). Samsung Email and others: open the app's settings, choose your account, then Outgoing server settings (or Server settings).
Turn on Require sign-in.
Enter your full email address as the user name and your email password.
Set SMTP server to smtp.pacific.net, Security type to STARTTLS (if your app does not offer STARTTLS, choose TLS), and Port to 587.
Save, then send yourself a test message.
Outlook
Outlook for Windows (classic, Microsoft 365 / 2016 / 2019 / 2021).
Choose File → Account Settings → Account Settings…, select your Pacific Internet account, and click Change (or double-click it).
Check that Outgoing mail server (SMTP) is smtp.pacific.net and that User Name is your full email address.
Click More Settings… → Outgoing Server tab. Check My outgoing server (SMTP) requires authentication and choose Use same settings as my incoming mail server.
On the Advanced tab set Outgoing server (SMTP) to 587 and Use the following type of encrypted connection to TLS (Outlook's name for STARTTLS).
Click OK, Next, then Finish, and send yourself a test message.
The “new” Outlook (Windows and Mac). Open Settings and look for your Pacific Internet account under Accounts → Email accounts. The same information is required: outgoing server smtp.pacific.net, port 587, STARTTLS/TLS, and your full email address and password. If you cannot find the outgoing server settings for your account, contact us and we will walk you through it.
Thunderbird
Choose Account Settings (the menu, or the gear in the lower left) and select Outgoing Server (SMTP) at the bottom of the account list.
Select smtp.pacific.net and click Edit….
Set Port to 587, Connection security to STARTTLS, and Authentication method to Normal password.
Set User Name to your full email address and click OK. Thunderbird asks for your password the next time you send; enter it and choose to remember it.
Look for Outgoing server, SMTP, or Server settings in the account settings and enter the values from The correct outgoing settings above. The two settings that matter most are authentication turned on and the full email address as the user name.
Checking that it worked
Send a message to yourself. It should leave your Outbox within a few seconds and arrive in your Inbox shortly afterward. If an earlier message is still in your Outbox, open it and send it again.
Still not working?
If you get a “password” or “authentication failed” error, retype the password in the outgoing settings and check that the user name is your full address in lowercase.
If your program warns that it cannot verify the server, check that the server name is spelled exactly smtp.pacific.net (or smtp.hostedbypacific.net).
Contact us at support@pacific.net or (707) 468-1005, Monday–Friday, 10:00 am–3:00 pm. Tell us which device or program you use and the exact error message.
For your security: never send your email password by email. If you need help, tell us which program you use and what error you see; we do not need your password to help you.
Setting up and using Thunderbird
Mozilla Thunderbird is a free desktop email program available for Windows, macOS, and Linux. This section walks through configuring Thunderbird for your Pacific Internet account, explains how incoming mail is organized once you are connected, and shows two ways to combine the new Lists and Updates folders back into a single view.
Initial setup
Before you begin, have your full Pacific Internet email address (for example customer@pacific.net) and your email password on hand.
Open Thunderbird. If this is the first time you have used the program, the account setup window appears automatically. Otherwise choose File → New → Existing Mail Account… (or, from the menu, Account Settings → Account Actions → Add Mail Account…).
Enter your full name as you would like it to appear on outgoing messages, your full Pacific Internet email address, and your email password.
Click Continue. Thunderbird will attempt to detect the server settings automatically.
If automatic detection succeeds and offers IMAP, accept it and click Done. If automatic detection fails, or if you wish to enter the settings yourself, click Configure manually and use the values shown in the Email Settings tables above. The connection security values are STARTTLS for IMAP (port 143) and STARTTLS for SMTP (port 587), and authentication is Normal password for both.
Click Re-test to verify the settings, then Done. Thunderbird will connect to the server and begin downloading your folder list.
Important: Use IMAP rather than POP3. IMAP keeps your mail on the server so it stays in sync across phone, laptop, and webmail.
How your mail is organized on the server
The Pacific Internet mail server pre-sorts incoming mail into folders under your account:
INBOX — regular mail from people and organizations you communicate with.
INBOX/Lists — mailing lists, newsletters, Substack, and similar bulk mail you have signed up to receive.
INBOX/Updates — automated notifications such as receipts, billing notices, no-reply messages, and alerts.
INBOX/Spam — junk mail and suspected phishing. See spam filtering for details. You will usually want to keep this folder separate.
If you would rather not have Lists and Updates split out, Thunderbird has two built-in ways to undo the split without any changes on the server.
Recommended: Option 1 below uses Thunderbird's Saved Search feature to display a single combined view while leaving each message in the folder the server filed it under. Nothing is moved, copied, or duplicated, and Spam continues to be kept separate.
Option 1 — Unified view (no messages are moved)
This option creates a virtual folder named All Inbox that shows the contents of INBOX, INBOX/Lists, and INBOX/Updates together. New mail arriving in any of those folders appears in the unified view automatically.
In the folder pane on the left, right-click your account name (for example, customer@pacific.net).
Choose New Saved Search…
For the folder name, enter All Inbox, or anything you prefer.
Click Choose… next to "Folders to search" and tick:
INBOX
INBOX/Lists
INBOX/Updates
Do not tick INBOX/Spam.
Leave Include sub-folders unchecked.
Choose Match all messages so the view shows everything in the selected folders.
Click OK.
An All Inbox folder appears in your folder list. Use it the way you would normally use INBOX. New mail from Lists and Updates appears there automatically as it arrives.
Option 2 — Move Lists and Updates into INBOX
If you would rather have everything physically inside INBOX so the layout looks the same on every device and not only inside Thunderbird, set up two message filters that pull new mail out of Lists and Updates as it arrives.
Open Tools → Message Filters…
In the Filters for: dropdown, select your Pacific Internet account.
Click New… to create the first filter:
Filter name: Pull Lists into Inbox
Under "Apply filter when", tick Manually and Periodically (every 10 minutes).
For the matching rule, choose Match all messages. If that option is not available in your version of Thunderbird, add a trivially-true condition such as Subject — isn't empty.
Under "Perform these actions", choose Move Message to and select INBOX.
Click OK.
Repeat the same steps for INBOX/Updates, naming the second filter Pull Updates into Inbox.
After creating each filter, run it once on the matching source folder so existing messages are moved as well. Right-click INBOX/Lists in the folder pane and choose Run Filters on Folder, then do the same for INBOX/Updates.
The Periodically setting keeps the filters running about every ten minutes, so new mail arriving in Lists or Updates is pulled into INBOX shortly afterwards.
Spam handling is unchanged
Both options above leave spam handling alone. Junk mail and suspected phishing still go to INBOX/Spam, and the filtering system continues to learn from messages you move into or out of that folder. For details, see How to Use the Spam Filtering System.
Sorting your own mail with filters
Beyond the built-in folders above, Thunderbird can create your own mail-sorting rules — for example, filing a specific mailing list or sender into its own folder automatically, on every device, not just in Thunderbird. See Sorting Your Mail with Filters (Sieve) in Thunderbird.
Apple Mail on iPhone & iPad
In the Mail app on iPhone and iPad, your Spam, Lists, and Updates folders sit underneath your Inbox and are hidden by default. If a message seems to be missing from your Inbox, it may have been filed into one of these folders. Revealing them takes a single tap.
Reveal the hidden folders
Open Mail and go to the Mailboxes screen (tap ‹ Mailboxes at the top-left until you see the list of folders).
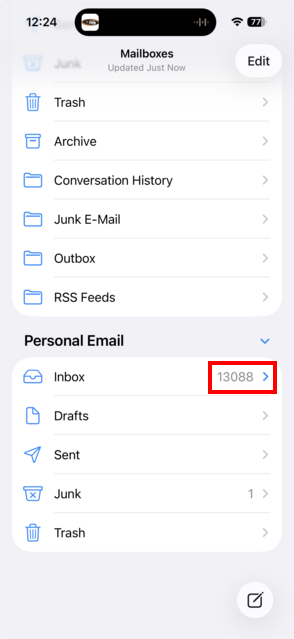
Find your account's Inbox. To the right of it, next to the message count, is a small arrow. In the first picture below it is highlighted with a red box.
Tap that arrow.
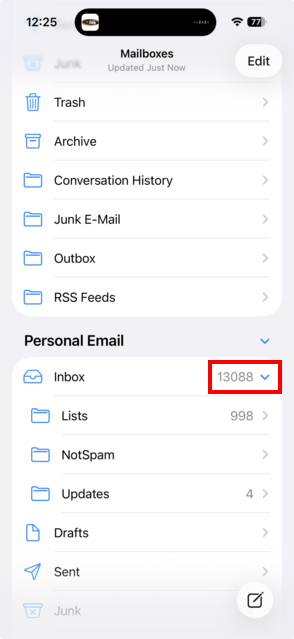
The arrow turns to point downward and your hidden folders — such as Lists, Updates, and Spam — appear indented beneath the Inbox, as shown in the second picture. Tap any folder to view its messages.
Before: the folders are hidden. Tap the arrow to the right of Inbox (red box).After: tapping the arrow reveals the folders beneath the Inbox.
Tip: Tapping the same arrow again hides the folders. Mail remembers the setting, so once expanded they normally stay visible.
Setup notes for additional email programs will be added to this page as they are written. Outgoing-mail settings for Apple Mail, Android, Outlook, and Thunderbird are in Can't send mail? Fix your outgoing settings. Any program that supports standard IMAP and SMTP will work with the Email Settings shown above.